


Q Studio Interface
How It Appears
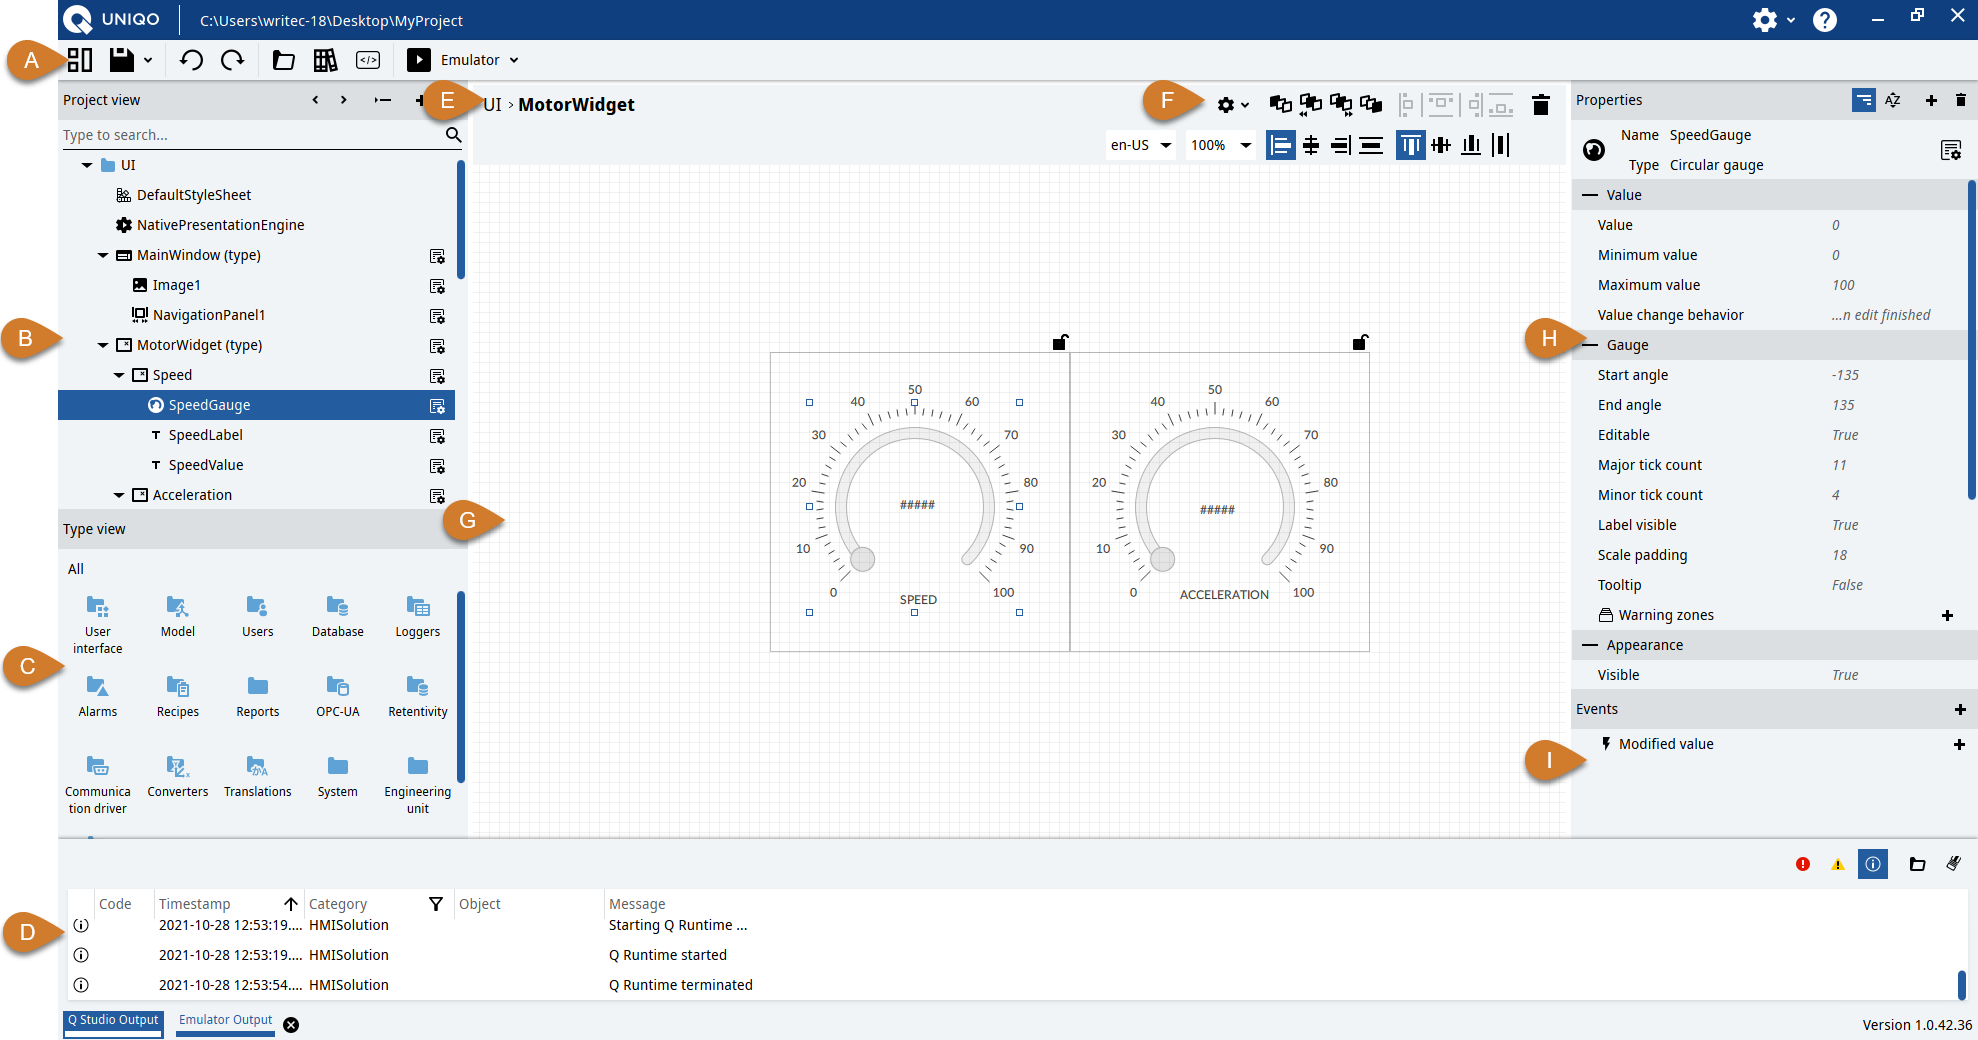
Part |
Name |
Description |
|---|---|---|
A |
Main toolbar |
See Main toolbar buttons. |
B |
Project panel |
Project information model to display and set the structure of nodes. The nodes can be organized according to parent/child logics. |
C |
Types panel |
Object Types and Variable Types:
|
D |
Log Panel |
Messaggi relativi al funzionamento di Q Studio (scheda Q Studio Output), dell’Emulator (scheda Emulator Output), delle Q Application in esecuzione e connesse a Q Studio (altre schede con il nome del target). |
E |
Path of the object being edited in the editor |
|
F |
Specific toolbar for the object type being edited in the editor |
|
G |
Object Editor |
Graphic editor to set interface objects or to configure other specific object types (e.g. tag importers, recipes, etc.) |
H |
Properties panel |
Editor to display and/or set the properties of the selected node in Project or in the object editor |
I |
Events panel |
Editor to subscribe methods to events that can be generated by the selected object in Project, or in the object editor (see Managing Methods and Events in Q Studio), or generated by another selected object. |
Main toolbar buttons
Button |
Function |
||||||||||||||
|---|---|---|---|---|---|---|---|---|---|---|---|---|---|---|---|
Create, open or close a project. |
|||||||||||||||
Save the project or export the Q Application. |
|||||||||||||||
Cancel the last operation. |
|||||||||||||||
Repeat the last operation. |
|||||||||||||||
Open the project resource window for displaying, importing or deleting project files such as images, videos, documents, certificates, etc. |
|||||||||||||||
Open the template library window and template variables. It contains both default and custom libraries. |
|||||||||||||||
Open the .NET project integrated in the UNIQO project, to integrate functionality through C# code. The .NET project is opened via the default editor configured in the settings. |
|||||||||||||||
Compile, transfer and run the application on the target. In the relative drop-down menu, Configure target opens the window to set the targets. |
|||||||||||||||
End the Q Application on the target. |
|||||||||||||||

|
Open the Q Studio Options window, which contains the following options:
The following items are available in the relevant drop-down menu:
|
||||||||||||||
Open the UNIQO local manual in the browser. |
Buttons in Properties
Button |
Function |
|---|---|

|
Go back in the panel selection history. |

|
Go forward in the panel selection history. |

|
Divide the Project panel into two panels. |
Create a new node inside the selected node. |
|
Remove the selected node and the nodes it contains. |
|
Group the child nodes: hide them from the Project and make them non-editable. |
|
Release the child nodes of the group: display them in the Project and make them editable. |
|
Only for some object types. Open the object in the dedicated editor. |
Log Panel Buttons
Button |
Function |
|---|---|

|
Show/hide the error messages of maximum severity. |

|
Shows/hides the error messages of minimum severity. |

|
Show/hide information notices. |

|
(in advanced mode only - see Configure the log panel) Show/hide additional information about the error messages or information notices displayed. |

|
(in advanced mode only - see Configure the log panel) Show/hide additional debug information about the error messages or information notices displayed. |
Open the logs folder of the running element (Q Studio at design time, Q Application at runtime or Emulator). |
|
Delete messages from the panel. |
|

|
Open the selection window of the modules to display in the Category column |
Information in the log panel
Column |
Column name |
Description |
|---|---|---|
1 |
Information level of the messages:
|
|
2 |
Code |
(Only for Q Studio native messages) Message ID code |
3 |
Time |
Message timestamp |
4 |
Category |
Category of Q Platform message or module that generated the message. |
5 |
Object |
|
6 |
Message |
Message content |
For the configuration of the levels of messages to be displayed, see Configure the log panel.
Editor Buttons
The buttons displayed change depending on the element being edited.
Properties Panel Buttons
Button |
Function |
|---|---|
Organize the properties in groups. |
|
Sort the properties in alphabetical order. |
|
Add a property to the node. |
|
Remove a property or reset a property to its default value. |
|
Only for some object types. Open the object in the dedicated editor. |
Events Panel Buttons
Button |
Function |
|---|---|
In the Events panel header: add an event of another object. Near an event: associate a method with the event. |
|
Delete the selected method. |
Common elements
Element |
Function |
|---|---|
Change the name or value of the element. |
|

|
Open the dynamic link window to set the value of the corresponding field with a dynamic link (see Dynamic Links and Dynamic Link Window). |

|
Open the dynamic link window to edit the existing link (see Dynamic Links and Dynamic Link Window). |

|
Open the specific dropdown menu for the relative button. |