


Set the main window
Resources for this module
Image to use as logo: download here.
Note
if the image is not automatically downloaded from the browser, right-click the image and save it using the relevant context menu item.
Purpose of this module
In this module, we will start the graphical setup of the Q Application. In particular, we will set the main window, which is the basic element that contains all the graphical elements of the HMI application, both in Q Studio (design time) and during execution (runtime).
We will add to the window the first two graphical elements always visible in the application interface: a company logo and a navigation menu. When started at runtime, the window will appear with the dimensions set in the project, but can be resized as desired, and the graphical elements inside it will reposition themselves accordingly.
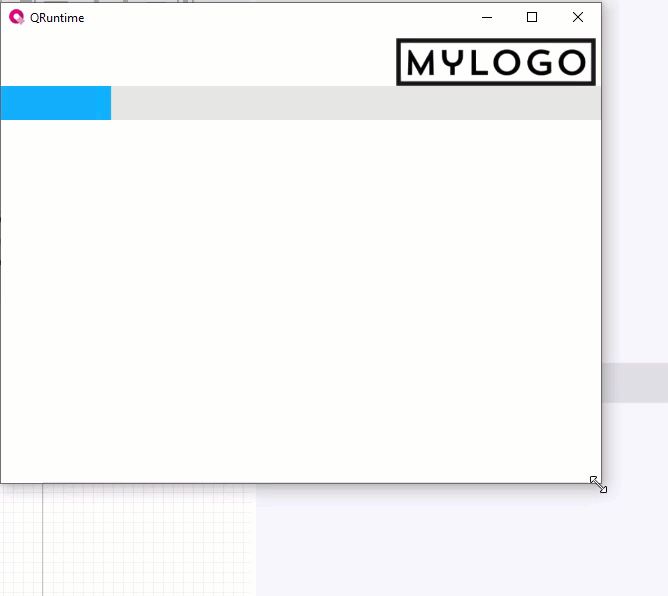
This is the final result:
Set the dimensions of the main window
By default, the project contains the Window MainWindow (type) object, i.e. the main window. We will customize its dimensions:
In the Project panel, in UI double-click MainWindow (type): the window appears in the editor.
Set the Full screen property to False.
In the Properties panel, set Width to 600 pixels and Height to 450 pixels. These are the dimensions the window will have at the start.
To save the changes, click
 in the main toolbar.
Note
every change to the project must be saved. The project can be saved at any time in the design. If there are unsaved changes when closing Q Studio, the system prompts to save.
Find out more about object sizing: Size of the objects.
Add and position the logo
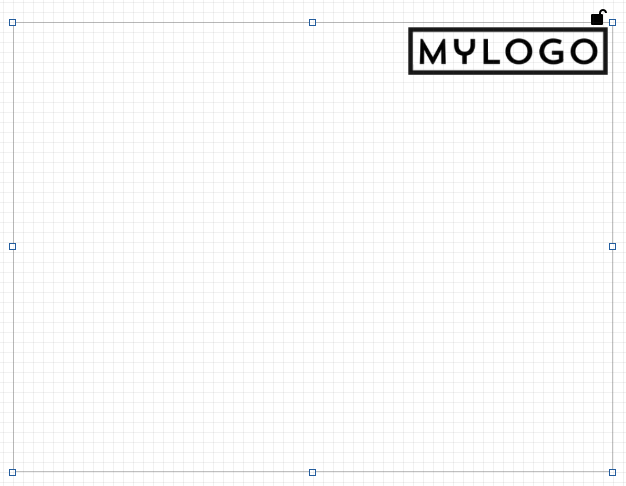
Drag the downloaded image (logo.png) from the folder on your PC into the window in the editor: the logo appears in the editor, and in the Project panel the corresponding Image1 object is created inside MainWindow (type).
To resize the logo, set its Width property to 200 pixels and Height property to Auto: the height is automatically set respecting the aspect ratio of the image.
To position the logo at the top right, slightly away from the window borders, set the following properties:
Horizontal alignment on Right and Vertical alignment on Top: the logo positions itself at the top right relative to the window, so it maintains its position regardless of the window size.
Top margin and Right margin at 5 pixels: regardless of the size of the window, the logo always keeps the same margin.
Click
to save the changes.
Find out more about relative positioning of objects: Positioning of the objects.
Organize the navigation
To navigate between the different panels that will make up the graphical interface, we will prepare a dedicated container, called Navigation panel Navigation Panel:
Right-click MainWindow (type), then select New > Containers > Navigation panel: NavigationPanel1 appears in MainWindow (type).
Among the properties, set Horizontal alignment and Vertical alignment to Stretch: in this way the panel occupies the entire height and width of the window.
To position the panel in height below the logo, set the Top margin property to 53 pixels.

Click
to save the changes.
The panel thus set stretches horizontally and vertically to the page size and maintains a fixed distance from the top margin, therefore from the logo.
Find out more about automatic object sizing: Size of the objects.
Check the operation at runtime
To check the operation at runtime of what we have done so far, we will run the application through the emulator included in Q Studio.
Press
 Emulator in the main toolbar: after a few moments the window of the running Q Application appears.
Note
if this is the first time a Q Application is run via the emulator, Windows requires a firewall rule to be configured. To proceed give access permission.
To stop the application running, close the window or click
 in Q Studio.
Find out more about the emulator: Target emulator.
To remember
MainWindow
It is recommended to add in the main window all the graphical elements and information that we always want to be displayed at runtime, regardless of the page/function being accessed, for example:
the company logo
a main navigation element, such as the Navigation panel object
information on the connection with a PLC, for example an LED which signals the connection status
contact information, for example for technical support, or other minor information.
Emulator
In every stage of development, ![]() Emulator can be clicked to check the application operation at runtime on your PC.
Emulator can be clicked to check the application operation at runtime on your PC.
Note
if there is no active license available, the application has a limited runtime of two hours.

